The React Lifecycle
Three phases of the React Lifecycle
React is, in essence, a combination of multiple components. A component can be as simple as a single user interface that represents a small portion of our application. Conceptually, a component lifecycle happens in three phases. This idea is displayed nicely in the following diagram from one of the maintainers of React "Dan Abramov."
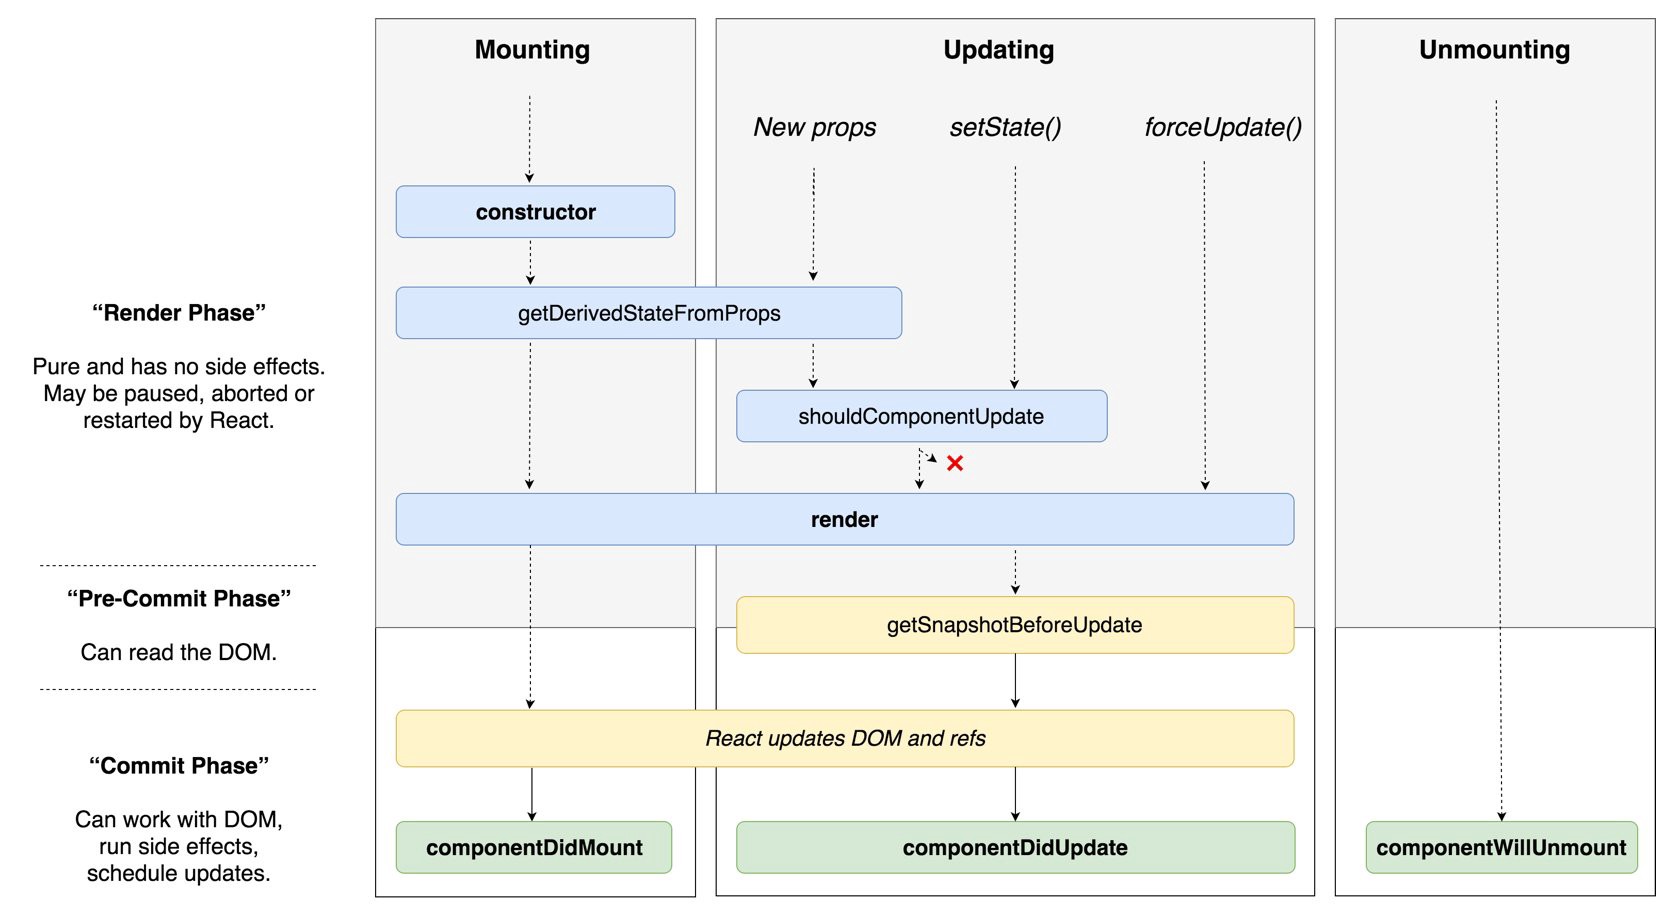
As you can see, the three React lifecycle phases are 1) Birth/Mounting, 2) Growth/Updating, and 3) Death/Unmounting.
The Birth/Mounting Phase
This is the phase when the component is being built from the ground up. A few things are happening here:
- Whatever initial data you want access to will be defined on the constructor of this phase
- Your render method is invoked.
- componentDidMount gets called as well.
Growth/Updating Phase
In the Growth/Updating phase you're updating compnent data.
- setState can be used to change the component's state data, forcing a call to render.
- shouldComponentUpdate is a method one could use here to stop a component from calling render if necessary.
Death/Un-mounting Phase
Again, self-explanatory, but the unmounting phase includes removing the component from the screen.
- Component is removed from the screen.
- componentWillUnmount is called and can be used for any clean up you may need to do.
How to Build It
Dive into the documentation at ReactJS and look into some of the key pieces of the LifeCycle API.
The methods that we're going to look at are:
constructorrendercomponentDidMountcomponentDidUpdatecomponentWillUnmount
Let's also compare where each of these methods belongs within the react lifecycle by looking at this diagram.
We will explore these in-depth later on but focus on warming up to the documentation and the idea that components have a lifecycle.
Contructor and Render Methods
The Constructor Function
You already know all about the constructor function as it pertains to classes in JavaScript. It's not much different in React. The constructor's purpose in React is to create components with inciting state data for the initial render. Any other props that the component receives on state can be done through the constructor function. We also used to bind all of our event handlers to the component via the constructor, and now we don't have to because of some special ESNext syntax that allows us to use arrow functions on our class methods. The following snippet is an example of this.
eventHandler = () => this.setState({ foo: 'bar' });We will have ample time to practice application set up with state data via the constructor, so for now, soak in these examples.
Let's say we have some data from an external file living within our application. Let's say, too, that we want our component to render a list of that data out to the DOM. We would need to import the external data as an array (we don't care about the shape or type of data, just that it lives on an array) and use the constructor to set it up on state.
import React from 'react';
import { data } from './extraneousSource.js';

class MyComponent extends React.Component {
  constructor() { // if I wanted to receive some props here I could pass them in through the constructor! constructor(props)...
    super(); // if i receive props through the constructor I will need to pass them back through super(props);
    this.state = {
       arbitraryStateData: data,
    }
  }
}
This is how we use the constructor in the mounting phase of our component's lifecycle. Now that our data is set up on state, we can access it during our render portion of the mounting phase.
In conclusion, the constructor function on a React class' component's purpose is to serve up initial state data for when the time comes to mount up your DOM elements.
The Render Method
The render() method is one of the React lifecycle methods that is used to tell React, to return some piece of DOM. The React virtual DOM will then handle the steps to mount those DOM pieces.
The render() method is required for a class component, and without it, the component won't work.
render should be a pure function, meaning it should return the same thing each time you call it. Its concern is to look at this.props and this.state and return some DOM element, a boolean, an array of DOM elements, and a couple of other things that you may want to reference or look into later.
The function is there to return what your component should render to the screen. Though many developers ignore it, render is an important lifecycle method and should be regarded as such.
Another essential item to remember about render is that it is called not only in the Mounting Phase of the component lifecycle but also during the Updating Phase. This duality makes the render() method unique because it exists across multiple phases.
Now that we have our state data set up for us, we can use that state data to give a list of elements to React and let it do its thing. Inside the render method of our component, let's return a list of items that the arbitraryStateData property (found on our state object) will generate.
render () {
  return (
    <div>
        // map returns an array remember? So lets give react an array of JSX elements and let it perform it's magic. For this example we'll assume this list is a string.
        {this.state.arbitraryStateData.map(data => <div>{data}</div>)}
    </div>
  );
}
One last thing to note is that any changes from setState invoke a call to our render method as well. We'll discuss more on this later, but it's important to remember that render() is called during mounting, and will be reinvoked if anything changes in our state object. You can think of the state object and render methods as existing together. The state object is like the bigger brother to the render function, it tells the render function what to do, and the render function obeys.
In conclusion, the render() method is how we tell React what data we want to turn into DOM elements. render() is necessary for every class component we create because we need it to return <JSX/> elements. It is involved in the Mounting Phase and the Updating Phase of our component's lifecycle.
Continue to think about these methods as the mounting methods in our component LifeCycle as you create more and more professional-looking code.
How to Build It
Let's build out some friends together using this code sandbox link. Take notes and share what you learned in a post on #Sprint-9-12 via Slack.
Once there, you should see a page that renders out a <h1> and <p> tags. You should also notice a people.js file that contains an array of objects with this shape.
{
  "id": 1,
  "first_name": "Suzi",
  "last_name": "Claiden",
  "email": "sclaiden0@arizona.edu",
  "occupation": "Biostatistician II",
  "friends": [
      {
          "firstName": "Gabe",
          "lastName": "Lemery"
      }
  ]
}
This is the data that our application will consume. Using the React LifeCycle methods, we will discuss how to get this data from one place to another.
Let's start at the beginning with our constructor method. But, first, let's define a name for our state data. Our data object is all about people, so let's call our state object "persons" (intentionally not "people," so that we can tell the two apart.)
Let's import the people and set them up on our constructor's state object.
import { people } from "./people";

...
constructor() {
  super();
  this.state = {
    persons: people
  };
}
...
Now that we imported data, we can loop over that friends array and generate a DOM element for each item in the array.
componentDidMount
The componentDidMount method is a part of the mounting phase in the React Lifecycle. This method gets called as soon as the render method is called the first time, and it begs the question…now what?
When our component has mounted, we have the bare-bones minimum. We need to put something on the screen, so now what?
Inside of componentDidMount we can call setState which forces a re-render of our component. This way, any asynchronous actions should be performed inside of our componentDidMount function, especially when it comes to fetching data via HTTP. Data fetching is the de-facto purpose for using componentDidMount within a component because of its position within the component lifecycle.
This method is guaranteed to be called only once in the whole lifecycle, immediately after a mounted component.
Until we know more about async AJAX calls, we'll use componentDidMount to set up state data living in a separate file. We'll do this by pulling the data in and setting it on state. This is also something you're going to have to do for your "Insta-clone" assignment today.
How to Build It
Let's put some of our knowledge together and build a React component that consumes data from a different resource.
To follow along, go ahead and click on this link that will take you to a CodeSandbox.
Your index.js file should look a lot like this:
import React, { Component } from "react";
import { render } from "react-dom";
import CitiesList from "./CitiesList";

class App extends Component {
  constructor() {
    super();
    this.state = {
      cities: []
    };
  }

  render() {
    return <CitiesList />;
  }
}

render(<App />, document.getElementById("root"));
We are merely importing in a component called CitiesList and returning it to the screen. CitiesList is a pure functional Component whose only responsibility is to render the props passed down to it onto the screen. We have two very different styles of components here.
The only problem is that CitiesList wants to render something out, in fact, right now, if you look at the console, you'll see that props is an empty object. Our goal is to try and fix that.
Inside of the cities.js file, you'll find a global object with a property data as an array of cities. Let's import that into our index.js file and utilize the data.
import cities from './cities.js';If we console.log our cities, you'll see that we now have access to them. To fix the issue set forward earlier, we need to set this data on state and pass that data down as props to our CitiesList component. We'll do this inside of componentDidMount
componentDidMount() {
  this.setState({ cities: cities.data });
}Module 2 Project: React Lifecycle
Every component in React has what we call a lifecycle. The lifecycle is a part of how our components operate under the hood. Being able to demonstrate an understanding of the React component lifecycle, and how to use a few of the "Methods" provided, will help you understand how and why React behaves the way it does.
The module project contains advanced problems that will challenge and stretch your understanding of the module's content. The project has built-in tests for you to check your work, and the solution video is available in case you need help or want to see how we solved each challenge, but remember, there is always more than one way to solve a problem. Before reviewing the solution video, be sure to attempt the project and try solving the challenges yourself.
Instructions
The link below takes you to Bloom's code repository of the assignment. You'll need to fork the repo to your own GitHub account, and clone it down to your computer:
Starter Repo: React Todo with AJAX
- Fork the repository,
- clone it to your machine, and
- open the README.md file in VSCode, where you will find instructions on completing this Project.
- submit your completed project to the BloomTech Portal