Web Unit 3 Sprint 9 - Class Components
Using Class Components
React gave us the idea of components as independent pieces of UI. And thus far, you have learned how to build out functional components to make multiple DOM elements. Now, we're going to be learning about React.Component base class that allows us to use some of the React team's methods to tap into the Component Lifecycle. These methods (known as life-cycle hooks, more on these to come) give us control over how our components work, and if we'd like to use them, we have to build out a class component that extends the React.Component parent class.
Whenever you see a line of code that looks like the following, you're using React.Component parent class, and you can tap into these methods:
class FooComponent extends React.Component {}By creating components as classes, you can set up a data object that your component is concerned with. This is done using state and setting up that object on our constructor method. Once we have some data that we can render out to the DOM, we need a vehicle that will allow us to render that data. This is achieved with the JSX method render() from within the life-cycle hook.
Key Steps
- Declare your class component by extending the React.Component parent class
- Use the constructor function to set up state (calling super() is required)
- Implement the render method to display UI
A helpful way to remember these steps is by using the acronym CCR (like Creedence Clearwater Revival): Class, Constructor, and Render/Return.
Example Component Structure
class FooComponent extends React.Component {
  constructor() {
    super();
    this.state = {};
  }
  render() {
    return <div>Hello, I am Foo Component</div>;
  }
}
Now that we have constructed a skeleton for our class component, it can be more dynamic. We'll achieve this by using pre-defined data that we want our component to display, using interpolation to present it to the DOM within some Text.
Components built by extending the Base React.Component class come with many benefits directly from the React API. While we'll discuss lifecycle methods in detail later, for now, let's focus on how a component can manage its own state (data) in a reactive way.
The state object we set up in our constructor has a React-specific purpose - it allows us to drive our UI using data. Consider Facebook as an example: you constantly interact with and see data updates in real-time while using the app. This reactive approach to data management is one of React's key strengths.
How to Build
Let's work together to build out a class component that prints a message to the screen using a few DOM elements. First, we will hold a message on state and print it to the screen by selecting it and assigning it to a DOM element. Then we will take it a step further and pass that message down to another component using props.
Go ahead and navigate over to this Codesandbox, where we will write our React code. CodeSandbox is an online editor that can be used to write React code right away! I can't emphasize how cool this is.
You'll notice that we're getting an error on this page. As we begin to define our app class, elements will start to come to life for us. But, for now, let's start by simply adding the class through CCR.
When you're done, your browser window should re-render without any errors. Your app class should look like this:
class App extends React.Component {
  constructor() {
    super();
    this.state = {};
  }
  render() {
    return <div>Hello From App!</div>;
  }
}
Now, let's add a property to our state data. Define a message property on the state object.
this.state = {
  message: "Hello from App State!!"
};
Now that we have the message on our component's state, we can use it through interpolation. In our render
method, let's change the message inside of div to reference the state object. Remember the this
keyword when pointing to an object on the class constructor.
render() {
  return <div>{this.state.message}</div>;
}
Hooray! You've now built your first class component, and you're ready to rock n' roll.
Using State and Props
Up until this point, our applications have been fairly simple. One or two components with a bit of state to allow for interaction. As our applications grow, so does the complexity in how components relate to each other. To do this, it helps to see our components as being structure in a parent / child relationship.
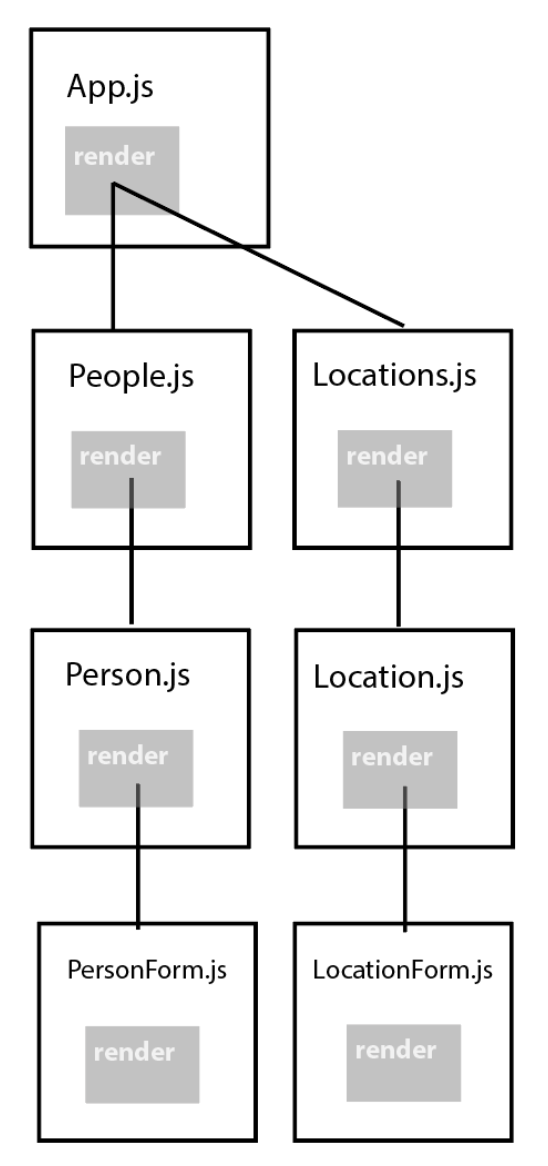
Here is an example of a more complicated application hierarchy.
Simple or complex, every application needs shared, persistent data to run.
Currently, we have been using state to hold that data. Unlike statically defined data within our component, state is persistent, changeable and can flow into other components through use of prop drilling. Changes to state immediately rerender the parts of our components effected by that change of state in a process called reactivity. When working with more complex component trees, state always runs from a parent component down to a child.
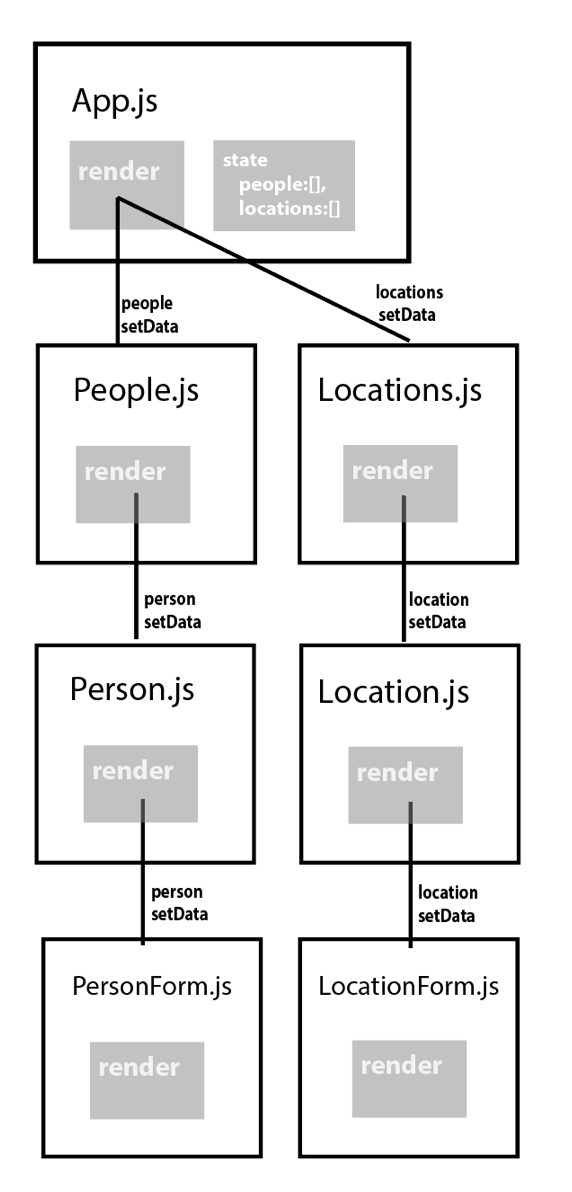
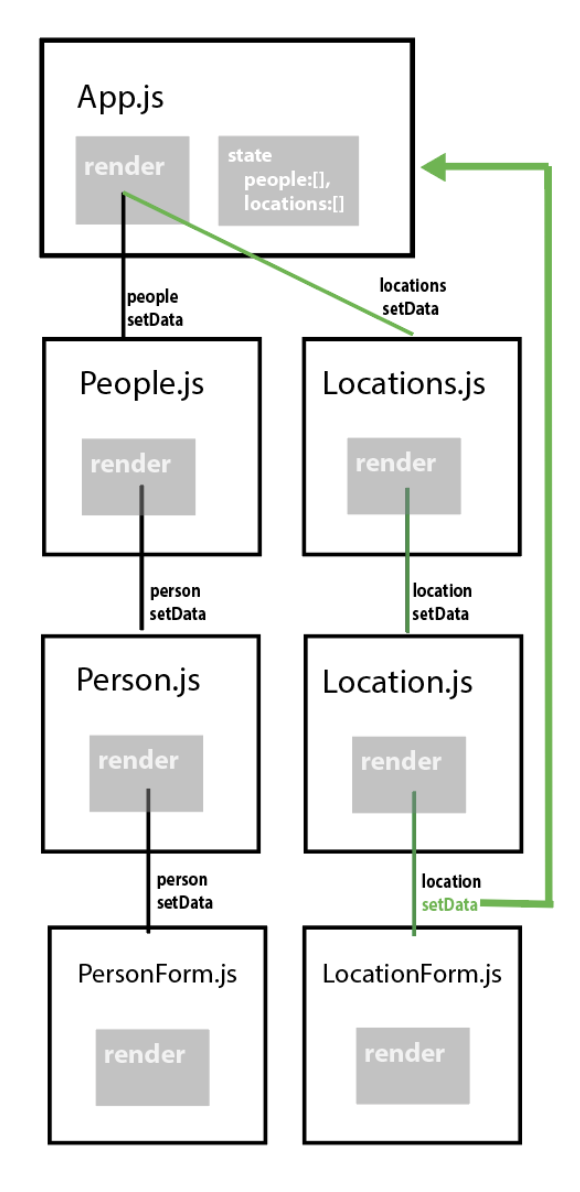
What if we want to modify that data? Just as we can pass parent state down through props, we can also pass functions that modify child state! Executing these functions in our child components will cause state to change at our parent level components, resulting in reactive rendering throughout our application!
We have already seen how to pass state through props using functional components. Now, let's take a look at how we work with state-in-class-based components.
How to Build It
Consider the following component:
class App extends React.Component {
  constructor() {
    super();
    this.state = {
      welcomeMessage: 'world!'
    };
  }

  render() {
    return (
      <div>
        <h1>Hello, {this.state.welcomeMessage}!</h1>
      </div>
    );
  }
}
Let's create a sub component using functional components to hold our welcome message.
const WelcomeBanner = (props) =>
{
  return(<h1>Hello, {props.message}!</h1>);
}
Now, lets refactor our component using React classes.
class WelcomeBanner extends React.Component {
    render(){
        return(
        <div>
            <h1>Hello, {this.props.message}</h1>
        </div>
    }
}
Notice that props are not passed in as they were in functional components. Instead, props are attached to the this object, just like state.
Great! We are sharing data between a component's state and a component's props. This means that when the state object changes, so too will the props.
Now let's add in the ability to modify that state. To do this, we will need to:
- Connect a state change method to an event listener in our child component.
- Create the substance of that method in our parent.
- Pass that method to the child through props.
Let's start at the bottom, our child component. Let's say that we want to use a form to dynamically update our message statement. This small component should do nicely:
const FormComponent = props => {
  return (
    <form>
      <input placeholder="change state" onChange={props.updateStateMessage} />
    </form>
};
The only problem is, we don't have access to state all the way down here! Let's build out our state changing method where it belongs, in App.js our parent. While we are at it, let's add our form component to our rendering so we can see it in the first place.
class App extends React.Component {
  constructor() {
    super();
    this.state = {
      welcomeMessage: 'world!'
    };
  }

  updateStateMessage = (e)=> {
    this.setState({welcomeMessage:e.target.value});
  }

  render() {
    return (
      <div>
        <WelcomeBanner message={this.state.welcomeMessage} />
        <FormComponent updateStateMessage={this.updateStateMessage}/>
      </div>
    );
  }
};
And there we go! We successfully passed our state data downstream through props in WelcomeBanner. At the same time, we can also successful pass data back upstream by executing state modifying functions passed through props in FormComponent.
User Interaction and Event Handling
In our last objective, we explored how state can be displayed and changed by passing state value and state modifying functions respectively through props. We explored this using the onChange eventlistener. That is, of course, only one of many user event you can integrate into your applications!
We have already seen how events are handled within React class components. We need an event handler function and we need to link it to an eventlistener method within our DOM.
class Button extends React.Component {
  handleButton = (e)=> {
    console.log(e);  }

  render() {
    return <button onClick={this.handleButton}>Click Me</button>;
  }
}
Notice once again the need for that this object when referencing our event handler. Within class components, just like our props and state, our event handlers are bound to the instance of this class and are accessed through this.
We have also seen that "e" parameter before. This parameter is known is React as a synthetic event object. Inside this object, we will have access to various pieces of information regarding this event triggered, including the target DOM element, the type of event, and methods that control the propagation of that event like preventDefault. For more details on the synthetic event objects, check out the reference materials here.
Let's add in some functionality to our event handler.
class Button extends React.Component {
  clickHandler = event => {
    console.log(event); // this is the react Synthetic Event
  };

  render() {
    return <button onClick={this.clickHandler}>Click Me</button>;
  }
}
Now, when we click on our button, we can actually print out our synthetic event object. We can now do anything we want within event handler, from triggering a change of state to starting an external api call.
How to Build It
Let's build a simple application that demonstrates handling various events in React class components:
class EventHandlerDemo extends React.Component {
  constructor() {
    super();
    this.state = {
      displayText: ''
    }
  }

  singleClickHandler = () => alert("Single Click!");

  doubleClickHandler = () => alert("Double Clicked!");

  mouseEnterHandler = () => alert("Mouse Entered");

  changeHandler = event => {
    this.setState({ displayText: event.target.value });
    console.log(this.state);
  };

  render() {
    return (
      <div className="App">
        <h1>Hello Handlers</h1>
        <h2>{this.state.displayText}</h2>
        <h3>Lets build out some handler functions.</h3>
        <button onClick={this.singleClickHandler}>Click Handler Demo</button>
        <button onDoubleClick={this.doubleClickHandler}>Double Click Handler</button>
        <div onMouseEnter={this.mouseEnterHandler}>Mouse Enter</div>
        <input
          onChange={this.changeHandler}
          placeholder="Change my input"
        />
      </div>
    );
  }
}
In this example, we've created several event handlers:
- A single click handler that shows an alert
- A double click handler that shows a different alert
- A mouse enter handler that triggers when the mouse enters a div
- A change handler that updates state with the input value
The change handler is particularly interesting as it demonstrates how to:
- Access the event object and its properties
- Update state based on user input
- Display the updated state in real-time
Module 1 Project: Class Components
Today we will learn all about classes in React. Then, we will use classes to build out our components. Class components have been a big part of the React ecosystem because they brought a lot of functionality that we normally didn't get with the React API when using function components. Now with hooks, that functionality is available in function components. However, many projects will still have class components in them, and we need to be prepared to work with classes when we see them.
The module project contains advanced problems that will challenge and stretch your understanding of the module's content. The project has built-in tests for you to check your work, and the solution video is available in case you need help or want to see how we solved each challenge, but remember, there is always more than one way to solve a problem. Before reviewing the solution video, be sure to attempt the project and try solving the challenges yourself.
Instructions
The link below takes you to Bloom's code repository of the assignment. You'll need to fork the repo to your own GitHub account, and clone it down to your computer:
Starter Repo: React Todo
- Fork the repository,
- clone it to your machine, and
- open the README.md file in VSCode, where you will find instructions on completing this Project.
- submit your completed project to the BloomTech Portal