Module 3: Building Components
Understanding Components
Now that you have learned the fundamentals of Web Design - including the DOM, how to select and manipulate elements, and how to manage events - let's talk about an important design pattern: components.
Components will help you focus on specific tasks during development, and greatly improve the readability and maintenance of the code base. Components can be re-used by other projects and pages, and can also be assigned during development to distinct teams or individuals, enabling a parallel development flow!
Designing with components is a modular approach broadly adopted in the Industry, either by "vanilla JS" developers or organizations that use complex frameworks, as you will learn in future modules.
Combining HTML, CSS and JavaScript
The traditional way of incorporating styles and scripts into your web app is to add
<style> and <script> tags to the HTML file. In this Learning Objective,
you will learn how to properly add styles and scripts into the HTML file by using these tags. Later, you will
learn how to link and separate HTML, CSS and JS in different files.
Styles
Styles are supposed to be declared inside the <head> of the HTML document.
If you include multiple <style> elements in your document, they will be applied to the DOM
in the order they are included in the HTML — so be aware of unexpected cascade issues.
Here's an example of styling paragraphs:
<!doctype html>
<html lang="en-US">

  <head>
    <meta charset="UTF-8" />
    <title>Test page</title>
    <style>
      p {
        color: red;
      }
    </style>
  </head>

  <body>
    <p>This is my paragraph.</p>
  </body>

</html>
Scripts
Scripts, on the other hand, are supposed to be included inside the <body> of the document.
While there's no requirement for where they appear inside the body, keep in mind that most browsers will
execute them in order of appearance.
If your script depends on a certain element being created and available in the DOM, you should always "delay" its execution to make sure the page will load properly.
In most cases, scripts should be executed when all of the HTML and Styles are already rendered in the DOM, that's why they usually appear in the end of the body. Let's compare two cases:
<!doctype html>
<html lang="en-US">
  <head>
    <meta charset="UTF-8" />
  </head>
  <body>
    <p id="target">This is a paragraph.</p>
    <p>This is another paragraph.</p>
    <script>
        document.querySelector('#target').innerText = "This paragraph was changed by JS!";
    </script>
  </body>
</html>
In the first example above, the script selects the first paragraph by ID and updates its text content. It works!
Now if you move the script to the beginning of the body, like this:
<!doctype html>
<html lang="en-US">
  <head>
    <meta charset="UTF-8" />
  </head>
  <body>
    <script>
        document.querySelector('#target').innerText = "This paragraph was changed by JS!";
    </script>
    <p id="target">This is a paragraph.</p>
    <p>This is another paragraph.</p>
  </body>
</html>
You will probably end up with the original HTML paragraph, as the script won't be able to find the target and select it while the page is parsing. Check the dev tools console and you should find an error message!
How to Build It
Currently, the Kolors application is a rather large HTML file, with all body elements, styles and JS script. You have to be careful with the script position in the body, and the order of declarations. For instance, you should declare the event handler functions before attaching them to elements, to avoid issues and/or warnings.
You have streamlined the code and moved some static elements from JS to HTML.
The current HTML looks like this:
<!DOCTYPE html>
<html lang="en">
  <head>
    <title>Kolors Palette Selector</title>
    <style>
      .container {
        display: flex;
        justify-content: center;
      }
      .rectangle {
        border: 1px solid black;
        margin: 2px;
        width: 10vw;
        height: 50vh;
        text-align: center;
        padding-top: 10px;
        font-weight: 700;
        color: white;
        text-shadow: 1px 1px black;
      }
      .dark-theme {
        background-color: black;
        color: white;
      }
    </style>
  </head>
  <body>
    <h1>Kolors Palette Selector</h1>
    <button type="button" id="togglebtn">Dark Theme OFF</button>
    <button type="button" id="palettebtn">Change Palette</button>
    <div class="container">
      <div class="rectangle"></div>
      <div class="rectangle"></div>
      <div class="rectangle"></div>
      <div class="rectangle"></div>
      <div class="rectangle"></div>
    </div>
    <script>
      const palette = [
        {
          name: "Charcoal",
          hex: "264653",
          cmyk: "(22,5,122,43)",
          rgb: "(120,34,65)",
          family: "Dark Minerals",
        },
        { name: "Persian green", hex: "2a9d8f" },
        {
          name: "Saffron",
          hex: "e9c46a",
          cmyk: "(23,121,43,45)",
          rgb: "(12,223,67)",
          family: "Pale Yellows",
        },
        {
          name: "Sandy brown",
          hex: "f4a261",
        },
        {
          name: "Burnt sienna",
          hex: "e76f51",
        },
      ];
      const containerNode = document.querySelector(".container");
      const paletteBtn = document.getElementById("palettebtn");
      const toggleBtn = document.getElementById("togglebtn");
      const colorBars = document.querySelectorAll(".rectangle");
      const welcomeMsg = document.createElement("h2");
      welcomeMsg.textContent =
        "Welcome, we are excited to help you choose the perfect palette! Use the button to shuffle through some beautiful color combinations.";
      welcomeMsg.style.border = "1px solid grey";
      welcomeMsg.style.padding = "0.5em";
      //handlers
      const toggleTheme = () => {
        document.querySelector("body").classList.toggle("dark-theme");
        if (toggleBtn.textContent == "Dark Theme OFF") {
          toggleBtn.textContent = "Dark Theme ON";
        } else {
          toggleBtn.textContent = "Dark Theme OFF";
        }
      };
      const changePalette = () => {
        colorBars.forEach((bar, index) => {
          bar.textContent = palette[index].name;
          bar.title =
            palette[index].family +
            " - HEX: 0x" +
            palette[index].hex +
            " - CMYK: " +
            palette[index].cmyk +
            " - RGB: " +
            palette[index].rgb;
          bar.style.backgroundColor = "#" + palette[index].hex;
          bar.id = palette[index + 1];
        });
      };
      //attaching handlers
      paletteBtn.addEventListener("click", changePalette);
      toggleBtn.addEventListener("click", toggleTheme);
      // inserting elements into DOM
      document
        .querySelector("h1")
        .insertAdjacentElement("afterend", welcomeMsg);
      document
        .querySelector("#palettebtn")
        .insertAdjacentElement("beforebegin", toggleBtn);
      changePalette();
    </script>
  </body>
</html>
Notice how the styles are properly inserted inside the <head>, and how the script is the last item in the body. Inside the script, you are first declaring some data structures, then selecting and updating elements, defining the handler functions, attaching them, inserting elements into the DOM, and finally calling the changePalette() function to initialize the color bars. This is a good ordering!
However, most of this app is really JS... the actual HTML is pretty simple, small, and should not require many edits through the development cycle. How can you improve the workflow and readability? That's what you will learn next!
Splitting HTML, CSS and JS
You will now learn how to improve readability and maintenance of your code by splitting HTML, CSS and JavaScript into separate files.
As your application evolves, your code grows and tends to become hard to read and maintain. Adding styling and JS directly into your HTML file is not always the best solution, and it's not uncommon to end up with hundreds of lines of code in a single file!
Using different files is one of the key concepts of building components! The HTML file will be responsible for "linking" all of the styles and scripts, making it easy to bring-in existing CSS templates and JS functions/objects to your project.
These external files can be quickly re-used by different applications, while developers can concentrate on designing and debugging code in a modular fashion.
Remember that coding in real life is often more about reading existing code than writing new code. By using external and independent files, you will be able to come back to any existing project and quickly understand the pieces, instead of going through hundreds of lines of code. This modular approach will also help other developers who may be collaborating in your project, today, or in the future.
Let's use the previous example and break it down into three files:
styles.css
#target {
   color: red;
}
scripts.js
document.querySelector('#target').innerText = "This paragraph's style and content was changed by external CSS and JS files!";index.html
<!doctype html>
<html lang="en-US">
  <head>
    <meta charset="UTF-8" />
    <link rel="stylesheet" href="styles.css">
  </head>
  <body>
    <p id="target">This is a paragraph.</p>
    <p>This is another paragraph.</p>
    <script src="scripts.js" defer></script>
  </body>
</html>
You might want to create these 3 files in your editor and check the results by loading the index.html page in a live server VSCode extension. The result is the same!
Let's understand what's happening here.
First, you are linking an external stylesheet (CSS file) with the <link> tag, still inside the <head>, as it should be. The rel attribute informs that this is in fact a CSS file, as other types of files could be linked. The href points to the file location - in this case, the styles.css file is in the same directory as the index.html.
Next, inside the body, you are linking the JS script with the src attribute, which points to the actual file. Notice the defer keyword, which will force the script to execute only after the page is parsed, meaning you could add this <script> element anywhere in the body!
At this point, no matter how complex the styling gets, or how the script evolves in the future, you won't need to come back to the HTML file. You could have a CSS ninja working on your project, and as long as the styling targets the #target id, the HTML can stay the same.
Similarly, you can add all kinds of functionalities to your script, like fetching data from external servers, making calculations, concatenating strings etc., and as long as the script is selecting and manipulating the #target element, you will be fine.
How to Build It
You decide to break down the Kolors code into three separate files. Easy! And it feels good:
index.html
<!DOCTYPE html>
<html lang="en">
  <head>
    <title>Kolors Palette Selector</title>
    <link rel="stylesheet" href="kolors.css" />
  </head>
  <body>
    <h1>Kolors Palette Selector</h1>
    <button type="button" id="togglebtn">Dark Theme OFF</button>
    <button type="button" id="palettebtn">Change Palette</button>
    <div class="container">
      <div class="rectangle"></div>
      <div class="rectangle"></div>
      <div class="rectangle"></div>
      <div class="rectangle"></div>
      <div class="rectangle"></div>
    </div>
    <script src="kolors.js" defer></script>
  </body>
</html>
kolors.css
.container {
  display: flex;
  justify-content: center;
}
.rectangle {
  border: 1px solid black;
  margin: 2px;
  width: 10vw;
  height: 50vh;
  text-align: center;
  padding-top: 10px;
  font-weight: 700;
  color: white;
  text-shadow: 1px 1px black;
}
.dark-theme {
  background-color: black;
  color: white;
}
kolors.js
const palette = [
  {
    name: "Charcoal",
    hex: "264653",
    cmyk: "(22,5,122,43)",
    rgb: "(120,34,65)",
    family: "Dark Minerals",
  },
  { name: "Persian green", hex: "2a9d8f" },
  {
    name: "Saffron",
    hex: "e9c46a",
    cmyk: "(23,121,43,45)",
    rgb: "(12,223,67)",
    family: "Pale Yellows",
  },
  {
    name: "Sandy brown",
    hex: "f4a261",
  },
  {
    name: "Burnt sienna",
    hex: "e76f51",
  },
];
const containerNode = document.querySelector(".container");
const paletteBtn = document.getElementById("palettebtn");
const toggleBtn = document.getElementById("togglebtn");
const colorBars = document.querySelectorAll(".rectangle");
const welcomeMsg = document.createElement("h2");
welcomeMsg.textContent =
  "Welcome, we are excited to help you choose the perfect palette! Use the button to shuffle through some beautiful color combinations.";
welcomeMsg.style.border = "1px solid grey";
welcomeMsg.style.padding = "0.5em";
//handlers
const toggleTheme = () => {
  document.querySelector("body").classList.toggle("dark-theme");
  if (toggleBtn.textContent == "Dark Theme OFF") {
    toggleBtn.textContent = "Dark Theme ON";
  } else {
    toggleBtn.textContent = "Dark Theme OFF";
  }
};
const changePalette = () => {
  colorBars.forEach((bar, index) => {
    bar.textContent = palette[index].name;
    bar.title =
      palette[index].family +
      " - HEX: 0x" +
      palette[index].hex +
      " - CMYK: " +
      palette[index].cmyk +
      " - RGB: " +
      palette[index].rgb;
    bar.style.backgroundColor = "#" + palette[index].hex;
    bar.id = palette[index + 1];
  });
};
//attaching handlers
paletteBtn.addEventListener("click", changePalette);
toggleBtn.addEventListener("click", toggleTheme);
// inserting elements into DOM
document.querySelector("h1").insertAdjacentElement("afterend", welcomeMsg);
document
  .querySelector("#palettebtn")
  .insertAdjacentElement("beforebegin", toggleBtn);
changePalette();
Conclusion
In reality, you have just created your first component!
If you rename the files from the Overview section to target.css and target.js, any application in the future will be able to re-use these two files to deal with any element with the id #target. In other words, the CSS and the JS files are in fact the component, specifically designed to style and manipulate the #target element of any page.
Components can also be designed to target specific class names, making them very versatile. Using components in your application is just a matter of linking the correct files and understanding the "API" of the component - which elements in my page will be targeted by the component? How do I design the initial HTML elements tree with the correct classes and IDs?
And remember that the JS code can also create new elements on the fly, so the HTML could be very simple to begin with!
That's the beauty of breaking down the code into separate files and concerns: easy to read, quick to maintain, flexible to re-use, agile to develop.
Encapsulating a Component in a Function
As you start practicing with the "components" mindset, you will eventually realize that some part of the code can be further broken down into simpler and more reusable components.
If you think about it, functions in JS are a natural "component", meaning they are supposed to perform a specific function and be re-used along the code. Otherwise, you would just write the code "inline", and not inside a function.
That's exactly why you will be creating "function components"! These are declared in a separate file and can be used by other components and pages in your application, or even by other applications.
Building a component using a function
Let's say your application will frequently create and initialize paragraph elements. You want to write a function component that will receive the text content as an argument, create the element, assign its text, and return the element node to the caller.
This component will not attach the newly created element to the page. Remember, we are trying to make each component perform a very simple and specific task. The caller will be responsible for storing the reference to the element and eventually attach it in the document, wherever needed.
Here's how this component could look like:
createP.js
function createParagraph(content) {
    const newParagraph = document.createElement('p');
    newParagraph.innerText = content;
    console.log(newParagraph);
    return newParagraph;
}
Very straightforward, and ready to be used multiple times in your application! All you have to do is import createP.js in the HTML body. Notice how the function is logging out the newly created element to the console, which is always a good practice during development.
How to Build It
While inspecting the kolors.js code, you noticed that the "Dark Mode" feature is something that could be used in many different applications and pages. Moreover, the feature relies on a HTML element, which is later selected and assigned a handler in the script. The handler definition is also in the main script. Not to mention that it also depends on a specific CSS class declared in kolors.css.
A well designed "Dark Mode" component should be able to create and add a CSS classes the button, assign a handler, and return the complete element for the application.
You start with the CSS:
dark-theme.css
.dark-theme {
  background-color: black;
  color: white;
}
You can now remove the code above from kolors.css.
Next, dark-theme.js (function component):
function createDarkThemeBtn() {
  const toggleBtn = document.createElement("button");
  toggleBtn.textContent = "Dark Theme OFF";
  const toggleTheme = () => {
    document.querySelector("body").classList.toggle("dark-theme");
    if (toggleBtn.textContent == "Dark Theme OFF") {
      toggleBtn.textContent = "Dark Theme ON";
    } else {
      toggleBtn.textContent = "Dark Theme OFF";
    }
  };
  toggleBtn.addEventListener("click", toggleTheme);
  return toggleBtn;
}
Next, just a few tweaks in the main JS, like removing everything that has moved to the new component script:
kolors.js:
// const palette = ...
const containerNode = document.querySelector(".container");
const paletteBtn = document.getElementById("palettebtn");
const colorBars = document.querySelectorAll(".rectangle");
const welcomeMsg = document.createElement("h2");
// welcomeMsg.textContent = ...
//handlers
// const changePalette = () => { ... }
//attaching handlers
paletteBtn.addEventListener("click", changePalette);
// inserting elements into DOM
document.querySelector("h1").insertAdjacentElement("afterend", welcomeMsg);
const toggleBtn = createDarkThemeBtn();
document
  .querySelector("#palettebtn")
  .insertAdjacentElement("beforebegin", toggleBtn);
changePalette();
Finally, edit the main HTML to add the new links and remove the html button:
index.html:
<!DOCTYPE html>
<html lang="en">
  <head>
    <title>Kolors Palette Selector</title>
    <link rel="stylesheet" href="kolors.css" />
    <link rel="stylesheet" href="dark-theme.css" />
  </head>
  <body>
    <h1>Kolors Palette Selector</h1>
    <button type="button" id="palettebtn">Change Palette</button>
    <div class="container">
      <div class="rectangle"></div>
      <div class="rectangle"></div>
      <div class="rectangle"></div>
      <div class="rectangle"></div>
      <div class="rectangle"></div>
    </div>
    <script src="dark-theme.js"></script>
    <script src="kolors.js" defer></script>
  </body>
</html>
You make sure that dark-theme.js is loaded before kolors.js, as it depends on the first file.
Returning a hierarchy of elements
Now you can move one step further and create a component that will create and return a hierarchy of elements! This could be a very helpful component, especially if your app creates pre-formatted sections.
Imagine your app is a blog that creates a dynamic summary page whenever the user posts new content. The summary page will contain several blocks, each one of them being a <div> with a title, a summary paragraph and a link for the full blog post:
createBlock.js
function createBlock(blog) {
    const newBlock = document.createElement('div');
    newBlock.classList.add('summary');
    const newTitle = document.createElement('h1');
    newTitle.innerText = blog.title;
    newBlock.appendChild(newTitle);
    const newSummary = document.createElement('p');
    const summaryText = blog.content.slice(0,50) + '...';
    newSummary.innerText = summaryText;
    newBlock.appendChild(newSummary);
    const newLink = document.createElement('a');
    newLink.href = blog.uri;
    newLink.innerText = "(click here to read full post)";
    newBlock.appendChild(newLink);
    console.log(newBlock);
    return newBlock;
}
This is getting interesting!
Your component is now creating and attaching many elements. You are even styling the <div> container with the .summary class, which could be defined in a separate CSS file:
createBlock.css
.summary {
    padding: 10px;
    border: 1px solid black;
    width: 200px;
}
Notice how the function expects to receive a blog object with some specific key/value pairs:
- title (string)
- content (string)
- uri (string)
A sample blog object like this should work:
const blog = {
            title: "Blog's Title",
            uri: "https://google.com",
            content: "Lorem ipsum dolor sit amet, consectetur adipiscing elit, sed do eiusmod tempor incididunt ut labore et dolore magna aliqua. Ut enim ad minim veniam, quis nostrud exercitation ullamco laboris nisi ut aliquip ex ea commodo consequat. Duis aute irure dolor in reprehenderit in voluptate velit esse cillum dolore eu fugiat nulla pariatur. Excepteur sint occaecat cupidatat non proident, sunt in culpa qui officia deserunt mollit anim id est laborum.",
        }
For the summary text, the function extracts the first 50 characters of the blog.content string and adding '...'
All that's left for your application is to pass the blog object (which was created when the user wrote the post) and attach the returned <div> container to the summary page.
How to Build It
Just as you wonder if there's anything in the Kolors app that could be turned into a multi-element component, the Product Manager calls you to request a new feature: the company would like to show multiple palettes at the same page, so users can easily compare them.
Well, the very core of the page is a nested element with five color bars representing a palette. This certainly looks like a component. You decide to edit the code, even if takes a while, facilitate development and save a lot of trouble in the future. You end up with the newly created palette.js:
function createPalette(id_number) {
  const palette = document.createElement("div");
  palette.id = "palette" + id_number;
  palette.classList.add("palette");

  const paletteBtn = document.createElement("button");
  paletteBtn.id = "palettebtn" + id_number;
  paletteBtn.classList.add("palettebtn");
  paletteBtn.innerText = "Change Palette";
  palette.appendChild(paletteBtn);

  const container = document.createElement("div");
  container.id = "container" + id_number;
  container.classList.add("container");
  palette.appendChild(container);

  for (i = 1; i++; i <= 5) {
    const rectangle = document.createElement("div");
    rectangle.id = id_number + "rectangle" + i;
    rectangle.classList.add("rectangle");
    palette.appendChild(rectangle);
  }

  return palette;
}
First, you realize that each palette should be a separate <div>, grouping a button, a container for the color bars, and the five color bars.
You decide to use an ID as argument for createPalette, so the application can keep track of each palette, select them individually (including its internal children).
Creating the five color bars is easy with a for loop. This is looking great! Of course, you know that you need to update the CSS and the HTML as well.
You feel proud for making some great improvements to the code! Your new component is able to create a multi-level element, assign IDs (including for each rectangle), assign classes, and return a full palette block to the application.
Adding interactivity and attaching to the DOM
Now let's add some interactivity to our code, by using the last example (blog summary) to create a fully functional page which reacts to the user's mouse position.
First, you will add another class to highlight the blog summary with a different background color:
createBlock.css
.summary {
    padding: 10px;
    border: 1px solid black;
    width: 200px;
}

.highlight {
    background-color: lightgreen;
}
Next, you will add a couple of event listeners to the newly created block. By using the mouseenter and mouseleave events, you can toggle the class of the container very easily, using a single event handler. This handler handler is defined as another function in the beginning of the file.
createBlock.js
function highLight(event) {
    event.target.classList.toggle('highlight');
}

function createBlock(blog) {
    const newBlock = document.createElement('div');
    newBlock.classList.add('summary');
    newBlock.addEventListener('mouseenter', highLight);
    newBlock.addEventListener('mouseleave', highLight);
    const newTitle = document.createElement('h1');
    newTitle.innerText = blog.title;
    newBlock.appendChild(newTitle);
    const newSummary = document.createElement('p');
    const summaryText = blog.content.slice(0,50) + '...';
    newSummary.innerText = summaryText;
    newBlock.appendChild(newSummary);
    const newLink = document.createElement('a');
    newLink.href = blog.uri;
    newLink.innerText = "(click here to read full post)";
    newBlock.appendChild(newLink);
    console.log(newBlock);
    return newBlock;
}
Arguably, you could have created another component just to add the event listeners to the block. But then again, not everything needs to be broken down into simpler components. You have to evaluate if a specific task is to be re-used somewhere else in the code or is just pertinent to this component.
In the walkthrough video, you will learn how to use a component to loop through several elements and add interactivity to each one of them.
Finally, let's create the HTML file with the proper links, and you should be able to test the page using a Live Server extension in VSCode:
createBlock.html
<!doctype html>
<html lang="en-US">
  <head>
    <meta charset="UTF-8" />
    <link rel="stylesheet" href="createBlock.css">
  </head>
  <body>
    <script src="createBlock.js"></script>
    <script>
        const blog = {
            title: "Blog's Title",
            uri: "https://google.com",
            content: "Lorem ipsum dolor sit amet, consectetur adipiscing elit, sed do eiusmod tempor incididunt ut labore et dolore magna aliqua. Ut enim ad minim veniam, quis nostrud exercitation ullamco laboris nisi ut aliquip ex ea commodo consequat. Duis aute irure dolor in reprehenderit in voluptate velit esse cillum dolore eu fugiat nulla pariatur. Excepteur sint occaecat cupidatat non proident, sunt in culpa qui officia deserunt mollit anim id est laborum.",
        }
      document.body.appendChild(createBlock(blog));
      document.body.appendChild(createBlock(blog));
      document.body.appendChild(createBlock(blog));
      document.body.appendChild(createBlock(blog));
    </script>
  </body>
</html>
Pro Tip: Although you are using the same blog object for all the summary blocks in this test, you need to call createBlock() four times, otherwise the browser will notice that this child is already in the DOM, and will ignore the other attachments.
How to Build It
You came back to the main code to test your new multi-level component and realized that the application needed to assign the changePalette handler to each button, for each palette. You asked yourself: why not do this inside the component?
Also, the button of a palette block should change the colors of that palette only! Gladly, your component is assigning unique IDs for each rectangle in the page. So it is just a matter of bringing the handler to the component and adding an ID argument to the handler, so it can also be unique, and select/manipulate only the rectangles inside that particular palette:
Your component JS code now looks like this:
const changePalette = (id_number) => {};

function createPalette(id_number) {
    const palette = document.createElement("div");
    palette.id = "palette" + id_number;
    palette.classList.add("palette");

    const paletteBtn = document.createElement("button");
    paletteBtn.id = "palettebtn" + id_number;
    paletteBtn.classList.add("palettebtn");
    paletteBtn.innerText = "Change Palette";
    paletteBtn.addEventListener("click", () => {
        changePalette(id_number);
    });
    palette.appendChild(paletteBtn);

    const container = document.createElement("div");
    container.id = "container" + id_number;
    container.classList.add("container");
    palette.appendChild(container);

    for (i = 1; i++; i <= 5) {
        const rectangle = document.createElement("div");
        rectangle.id = id_number + "rectangle" + i;
        rectangle.classList.add("rectangle");
        palette.appendChild(rectangle);
    }

    return palette;
}
Beautiful! Now the application does not have to worry about event handling, and by using the arrow notation in the addEventListener, you were able to assign individual handlers for each button. Whenever the changePalette handler is triggered by a button, it will receive the palette ID and from there, will be able to correctly select each rectangle inside that palette to change the colors.
All you have to do now is finish writing the handler code, which you will do after taking a coffee break to celebrate this achievement!
Conclusion
Creating components is an important skill to learn in Web Development, wether you are using Vanilla JS or more advanced frameworks, as you will learn in Sprint 6.
You have learned how to properly split applications in HTML, CSS and JS files, how to link these files, and how to code functionalities into separate components. This is a major step in your developer career!
Next, you will learn how to process data structures in your components.
Building DOM Using Components and Data
In the last Core Competency, you have learned how to create a sample JS object to send as an argument to a function component. But often, you will need to retrieve data from a local or external database, filter it, manipulate the information, and then pass the argument to the component.
The more you learn about Web Development, the more you realize that, at their core, most applications are looping over the same basic steps:
- Wait for user interaction
- Prepare data arguments
- Call components with arguments (and get results)
- Decide what to add, update or remove from the the DOM
In this Core Competency, you will focus on step 2: how to create arguments and effectively tell the components what they should do, so the app can dynamically render a new page in the browser, complete the loop, and wait for the next user interaction.
More specifically, you will learn how to manipulate data sets in the JSON format.
Understanding JSON documents
For as long as the Internet exists, applications rely on moving data across computers. You name it: peer-to-peer, server-client, e-mail, web browser, crypto wallets, etc. Every single application works by sending and receiving data.
How this data is formatted and transmitted is really up to the developers. Sometimes, companies use a customized proprietary solution to send binary data that is not human-readable. But in many cases, clients and servers use a standard way to communicate, not only to take advantage of public libraries but to allow third parties to develop additional solutions that "speak the same language".
JSON is one of these formats! JSON stands for "JavaScript Object Notation" and is used widely by developers of all trades to send and receive data, as well as to save and load data from local storage.
JSON is especially useful when developing with JavaScript since it's effortless to encode and decode by applications. Moreover, JSON is human-readable and smaller (lightweight) than other solutions (such as XML). JSON's benefits are so universally appreciated that most public (and many private) web services expect to receive JSON and are configured to send JSON data back.
The JSON Format
A JSON data structure resembles a JavaScript object (e.g., arrays, strings, objects with key/value pairs). Here's an example of a simple JSON array-like data set containing different types of data:
[ 100, 500, false, 300, "hello", 200, 400 ]Here is another JSON array, with multiple objects and their corresponding key/value pairs:
[
  {
    "color": "red",
    "value": "#f00"
  },
  {
    "color": "green",
    "value": "#0f0"
  },
  {
    "color": "black",
    "value": "#000"
  }
]
And a more complex nested object-like data set:
{
  "id": "0001",
  "type": "donut",
  "name": "Cake",
  "ppu": 0.55,
  "batters": {
    "batter":
      [
        { "id": "1001", "type": "Regular" },
        { "id": "1002", "type": "Chocolate" },
        { "id": "1003", "type": "Blueberry" },
        { "id": "1004", "type": "Devil's Food" }
      ]
  },
  "topping":
    [
      { "id": "5001", "type": "None" },
      { "id": "5002", "type": "Glazed" },
      { "id": "5005", "type": "Sugar" },
      { "id": "5007", "type": "Powdered Sugar" },
      { "id": "5006", "type": "Chocolate with Sprinkles" },
      { "id": "5003", "type": "Chocolate" },
      { "id": "5004", "type": "Maple" }
    ]
}
As you can see, a JSON data set can have multiple levels and many data types, such as strings, booleans, or numbers.
Pro Tip: inside a JSON object, the key of a key/value pair should always be enclosed in quotes.
How to Build It
You expect the Kolors app to deal with hundreds of colors at some point. You will need to somehow access all that information, which includes color names, hex codes, cmyk codes, color family etc.
You find out that the company already has its own database of colors, which is used for manufacturing. If you could only export all that data to JSON...
Right now, your test data set is a JS object that looks like this:
const palette = [
  {
    name: "Charcoal",
    hex: "264653",
    cmyk: "(22,5,122,43)",
    rgb: "(120,34,65)",
    family: "Dark Minerals",
  },
  { name: "Persian green", hex: "2a9d8f" },
  {
    name: "Saffron",
    hex: "e9c46a",
    cmyk: "(23,121,43,45)",
    rgb: "(12,223,67)",
    family: "Pale Yellows",
  },
  {
    name: "Sandy brown",
    hex: "f4a261",
  },
  {
    name: "Burnt sienna",
    hex: "e76f51",
  },
];
This array is a good starting point, but you know that having the data come to you in JSON would be ideal. So you decide to transform your test data into JSON. No problem! You convert your test data over to JSON so it looks like this:
[
  {
    "name": "Charcoal",
    "hex": "264653",
    "cmyk": "(22,5,122,43)",
    "rgb": "(120,34,65)",
    "family": "Dark Minerals"
  },
  {
    "name": "Persian green",
    "hex": "2a9d8f"
  },
  {
    "name": "Saffron",
    "hex": "e9c46a",
    "cmyk": "(23,121,43,45)",
    "rgb": "(12,223,67)",
    "family": "Pale Yellows"
  },
  {
    "name": "Sandy brown",
    "hex": "f4a261"
  },
  {
    "name": "Burnt sienna",
    "hex": "e76f51"
  }
]
Excellent! Each object in the array has been converted to JSON, which gives it quite a bit of flexibility. The JSON format is very similar to the objects in the array, but you get the added benefit of being able to send and receive this data from any source that offers JSON. For now, you expect your data to come from Kolor's database, but you can technically receive data from any database if it sends its data in JSON (which it probably will).
Parsing JSON
Let's understand how to interface JS scripts with JSON. You will learn how to parse or read JSON data into your app and how to create JSON that your application can send to an external peer or server.
Before you move on, remember that a JSON data set is always a string inside JS. Otherwise, it would be just a regular JS object.
Use your dev tools console to compare these:
const acmeJS = [ 100, 500, false, 300, "hello", 200, {x: 3, y: 5} ];
const acmeJSON = '[ 100, 500, false, 300, "hello", 200, {"x": 3, "y": 5} ]';
console.log(acmeJS);
console.log(acmeJSON);
Your console output should look like this:
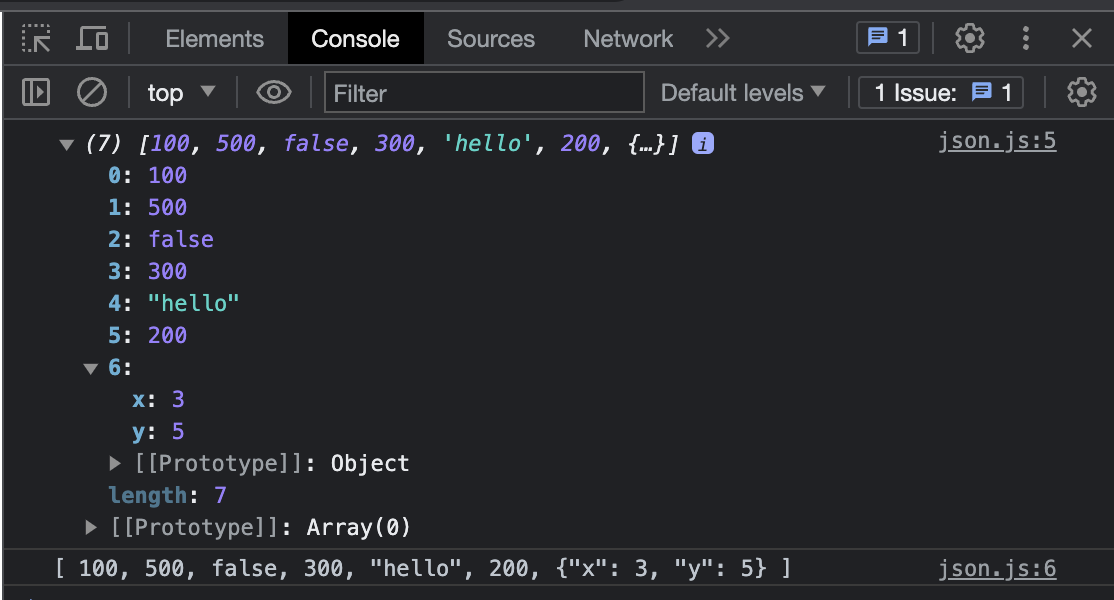
Notice how the first log represents a complete JS object, with the array, its contents, and all the properties and methods of the object. Of course, this differs from the kind of data you want to save to local storage or send out to an external server. The second log, on the other hand, is just a simple string or a representation of the first object. The second log is the JSON data set, a serialized string that can be sent or received over the Internet.
JavaScript exposes several methods from the native JSON namespace that you can use to parse values from and convert values to the JSON format.
JSON.stringify()
JSON.stringify() is a method that will convert any JavaScript object to a properly formatted JSON string representation.
So if you stringify the object from the example below:
const acmeJS = [ 100, 500, false, 300, "hello", 200, {x: 3, y: 5} ];
const acmeJSON = JSON.stringify(acmeJS);
console.log(acmeJSON);
You will get:
[100,500,false,300,"hello",200,{"x":3,"y":5}]Which is the smallest possible representation of the full JavaScript object (array in this case), with quotes added for every key.
JSON.parse()
JSON.parse() will parse a JSON data set (string) to a corresponding JavaScript object. The return value is the object, array, string, number, boolean, or null value corresponding to the given JSON text. If you reverse the action above:
const acmeJSON = '[100,500,false,300,"hello",200,{"x":3,"y":5}]'; // Remember to use quotes!
const acmeJS = JSON.parse(acmeJSON);
console.log(acmeJS);
You will get the full JavaScript object (array)!
How to Build It
You were finally able to get some of the color data set exported to JSON. It is currently saved in a separate JavaScript file as a string:
const colorsJSON = '[{"family":[{"name":"Dark Minerals","mood":"Relaxing","color":[{"name":"Charcoal","hex":"26EAC3","cmyk":"(22,5,122,43)","rgb":"(120,34,65)"},{"name":"Graphine","hex":"FFC653","cmyk":"(12,54,12,143)","rgb":"(10,234,165)"},{"name":"Clay","hex":"262DE3","cmyk":"(12,15,12,245)","rgb":"(127,134,65)"}]},{"name":"Pale Yellows","mood":"Creativity","color":[{"name":"Saffron","hex":"e9c46a","cmyk":"(13,11,143,25)","rgb":"(123,23,167)"},{"name":"Eggnog","hex":"ccc46a","cmyk":"(3,21,243,145)","rgb":"(2,23,267)"},{"name":"Sunset","hex":"ef3ba5","cmyk":"(200,221,13,15)","rgb":"(2,123,88)"}]}]}]'You run this JSON string through the dev tools console to visualize the nesting:
> const colorsJSON = ...

> JSON.parse(colorsJSON)

[
  {
    family: [
      {
        name: "Dark Minerals",
        mood: "Relaxing",
        color: [
          {
            name: "Charcoal",
            hex: "26EAC3",
            cmyk: "(22,5,122,43)",
            rgb: "(120,34,65)",
          },
          {
            name: "Graphine",
            hex: "FFC653",
            cmyk: "(12,54,12,143)",
            rgb: "(10,234,165)",
          },
          {
            name: "Clay",
            hex: "262DE3",
            cmyk: "(12,15,12,245)",
            rgb: "(127,134,65)",
          },
        ],
      },
      {
        name: "Pale Yellows",
        mood: "Creativity",
        color: [
          {
            name: "Saffron",
            hex: "e9c46a",
            cmyk: "(13,11,143,25)",
            rgb: "(123,23,167)",
          },
          {
            name: "Eggnog",
            hex: "ccc46a",
            cmyk: "(3,21,243,145)",
            rgb: "(2,23,267)",
          },
          {
            name: "Sunset",
            hex: "ef3ba5",
            cmyk: "(200,221,13,15)",
            rgb: "(2,123,88)",
          },
        ],
      },
    ],
  },
];
Nice! You are glad that you have grouped the colors by family. You have also added a "mood" for each family and keys for every info. Now it will be much easier to access and filter color information, change the palettes, and show details on the page.
Iterating over data to build JSON
Ok, let's have some fun!
Say you want the application to display several blog summaries on the page, so the user can choose what to read and access the full post content. You may be creating digital signage for the airport lounge!
Let's assume your app somehow got ahold of the JSON below (you will learn how to retrieve JSON data from the Internet in the following Core Competency):
const summariesJSON = '[{"title":"Delayed Flights","uri":"https://info.airport/001.html","content":"Terminal C is experiencing delays due to conveyor belt..."},{"title":"New Cafe","uri":"https://info.airport/002.html","content":"Passengers in transit to the international lounge..."},{"title":"Security Update","uri":"https://info.airport/003.html","content":"As of today, TSA requires that all carry-on luggage..."},{"title":"Weather Forecast","uri":"https://info.airport/004.html","content":"Expect light showers from 3pm to 5pm as the..."}]'The first thing you should do is to parse the JSON data, not only to manipulate its contents in the script, but also to visualize the object nesting in the console:
const summaries = JSON.parse(summariesJSON);
console.log(summaries);
Let's revisit some code from a previous Core Competency and use the JSON data to create the summary page. Assume the createBlock component below is already available and has been used by other applications. You don't need to mess with the CSS or the JS files, although you could make some tweaks if you wanted to:
createBlock.css:
.summary {
    padding: 10px;
    border: 1px solid black;
    width: 200px;
    margin: 10px;
    display: inline-block;
}

.highlight {
    background-color: lightgreen;
}
createBlock.js:
function highLight(event) {
    event.target.classList.toggle('highlight');
}

function createBlock(summary) {
    const newBlock = document.createElement('div');
    newBlock.classList.add('summary');
    newBlock.addEventListener('mouseenter', highLight);
    newBlock.addEventListener('mouseleave', highLight);
    const newTitle = document.createElement('h2');
    newTitle.innerText = summary.title;
    newBlock.appendChild(newTitle);
    const newSummary = document.createElement('p');
    const summaryText = summary.content;
    newSummary.innerText = summaryText;
    newBlock.appendChild(newSummary);
    const uri = summary.uri;
    newBlock.addEventListener('click', ()=>{window.open(uri, '_blank')})
    return newBlock;
}
The main HTML file is now linking to the createBlock component (CSS and JS), and you added a link to the main JS script airportSignage.js:
airportSignage.html
<!doctype html>
<html lang="en-US">
  <head>
    <meta charset="UTF-8" />
    <link rel="stylesheet" href="createBlock.css">
  </head>
  <body>
    <script src="createBlock.js"></script>
    <script src="airportSignage.js"></script>
  </body>
</html>
And finally, the actual JS code that you wrote to use the component and render the DOM:
airportSignage.js
const summariesJSON = '[{"title":"Delayed Flights","uri":"https://info.airport/001.html","content":"Terminal C is experiencing delays due to conveyor belt..."},{"title":"New Cafe","uri":"https://info.airport/002.html","content":"Passengers in transit to the international lounge..."},{"title":"Security Update","uri":"https://info.airport/003.html","content":"As of today, TSA requires that all carry-on luggage..."},{"title":"Weather Forecast","uri":"https://info.airport/004.html","content":"Expect light showers from 3pm to 5pm as the..."}]'

const summaries = JSON.parse(summariesJSON);

summaries.forEach((entry) => {
    const block = createBlock(entry);
    document.body.appendChild(block);
});
The main code is just a few lines, and it is iterating (looping) over the array to call the createBlock function with every single entry from the array. Inside the loop, the returned value (a completely new block) is stored and then attached to the document body.
By using pre-existing components, you created a page with just a few lines of code!
How to Build It
The colors are already structured in families in the colors data set, but you need to create actual palettes - groups of five colors - to use in the Kolors application.
You ask the PM to provide you with a few palettes so you can create another JSON data set. The JS object parsed from the newly created JSON is a simple array containing groups of five hex codes:
palettes:
[
  ["#FF4136", "#FF851B", "#FFDC00", "#2ECC40", "#0074D9"],
  ["#001f3f", "#0074D9", "#7FDBFF", "#39CCCC", "#3D9970"],
  ["#85144b", "#F012BE", "#B10DC9", "#FFDC00", "#FF851B"],
  ["#F012BE", "#B10DC9", "#FF4136", "#FF851B", "#FFDC00"],
  ["#3D9970", "#2ECC40", "#FF4136", "#FF851B", "#FFDC00"]
]
The changePalette() function can now access the palettes object and iterate over it every time the user clicks on the button, changing the palette displayed on the screen. When choosing the next palette, you must keep track of the currently displayed palette and check for array boundaries.
During tests, you move the palettes array into the component file, and you start designing the changePalette() handler:
const palettes = [
  ["#FF4136", "#FF851B", "#FFDC00", "#2ECC40", "#0074D9"],
  ["#001f3f", "#0074D9", "#7FDBFF", "#39CCCC", "#3D9970"],
  ["#85144b", "#F012BE", "#B10DC9", "#FFDC00", "#FF851B"],
  ["#F012BE", "#B10DC9", "#FF4136", "#FF851B", "#FFDC00"],
  ["#3D9970", "#2ECC40", "#FF4136", "#FF851B", "#FFDC00"]
];

const changePalette = (id_number) => {
  const colorBars = document.querySelectorAll(
    "#palette" + id_number + " .rectangle"
  );
  const nextPalette = // code to get current palette, increment, perhaps from a global variable
  colorBars.forEach((bar, index) => {
    bar.style.backgroundColor = palettes[nextPalette][index];
    //future code to retrieve and update cmyk code, color name, etc...
  });
};
To get all the additional information for a given color from the colors data set, you must loop over the entire colors array, looking for the specific hex code. This information (i.e., CMYK code, family, etc.) will populate the rectangle's title attribute, so the user can see them while hovering over a color bar.
You may be sensing that this looping/searching approach could be more efficient, which is why servers generally handle these kinds of lookups for you. You can be specific in your requests to the server and only ask for what you need. These servers can then lookup the data much quicker than JavaScript.
However, you'll encounter scenarios where you must do these lookups locally. For these cases, use lightweight JSON data sets that are easy to parse. You can even customize the JSON to suit your needs. You could have a JSON structured by families to replace individual bars with colors of the same family quickly and another JSON indexed by hex code to retrieve color name, CMYK code, etc.
Conclusion
Many components built in JS expect to receive JSON data as arguments and/or return JSON data to the caller. Likewise, most popular web services work with JSON data sets. JSON has become the universal expectation, and you can now read and parse it as needed. After all, JSON is just a stringified representation of a JS object, which can easily be parsed inside your app.
Next, you will increase your knowledge about asynchronous JavaScript, which is particularly important for fetching data from external sources.
Module 3 Project: Building Components
For this project, you will build a dynamic web application using components. The project involves creating components for a navigation bar, learner cards, and a footer. You will also be adding interactivity to the page. The final application will display information about learners and allow users to interact with the displayed data.
The module project contains advanced problems that will challenge and stretch your understanding of the module's content. The project has built-in tests for you to check your work, and the solution video is available in case you need help or want to see how we solved each challenge, but remember, there is always more than one way to solve a problem. Before reviewing the solution video, be sure to attempt the project and try solving the challenges yourself.
Instructions
The link below takes you to Bloom's code repository of the assignment. You'll need to fork the repo to your own GitHub account, and clone it down to your computer:
Starter Repo: Building Components
- Fork the repository,
- clone it to your machine, and
- open the README.md file in VSCode, where you will find instructions on completing this Project.
- submit your completed project to the BloomTech Portal