Module 2: JavaScript Control Flow
Falsiness
Introduction
Booleans that are either true or false exist in nearly every programming language, but JavaScript goes a step further by allowing other values to represent true or false. We describe these values as "truthy" or "falsy". The terms "truthy" and "falsy" are industry terms, you will use them both in this course and throughout your career, so it is important to understand how these terms are applied.
This section will cover truthy, falsy and we will introduce the not (!) operator. The not operator allows us to achieve the opposite Boolean equivalent of a truthy or falsy value. Getting the opposite of a truthy and falsy value has many applications in coding.
Pre-requisites
You will need to understand values, variables, and comparisons to best grasp this material. If you feel a review of these concepts would be useful, return to their respective modules before reading on.
Case Study: Viking Runners
Throughout this module, you will see code examples for the nonprofit Viking Runners. Viking Runners organizes team relay races where runners complete different parts of the race path over 24 hours. Before each race, each team must go through a thorough check-in process with a race coordinator. This process is time-consuming when done manually and is prone to error, so a system is being built to ensure the race coordinators are checking in each team correctly. As you read through how to this module, you will address various requirements regarding this check-in process in the code examples.
Working with truthy and falsy values
Overview
In JavaScript, a value is considered "falsy" if it is either the boolean value false, or one of the five false values when converted to a boolean. These five values are:
- 0 (the number zero)
- '' (an empty string)
- null
- undefined
- NaN (not a number)
Any other value in JavaScript is considered "truthy". This means that, when any value is converted to a boolean, it will be true unless it is one of the five values listed above, in which case it will be false.
For example, the number one is truthy because it is not 0. The string 'hello' is also truthy, because it is not an empty string. On the other hand, the number 0 and the string '' are both falsy because they are one of the five falsy values.
How to Build it
Two race requirements include determining if a team has no runners and if the team has a team name. A nameless team with no runners is likely an error and shouldn't show up during the sign-in process. To determine this, we could check how many runners a team has.
numberOfRunnersForTeam1 = 5;
numberOfRunnersForTeam2 = 0;
numberOfRunnersForTeam3 = undefined;

let doesTeam1HaveRunners = Boolean(numberOfRunnersForTeam1); // doesTeam1HaveRunners will be true because 5 is truthy
let doesTeam2HaveRunners = Boolean(numberOfRunnersForTeam2); // doesTeam2HaveRunners will be false because 0 is falsy
let doesTeam3HaveRunners = Boolean(numberOfRunnersForTeam3); // doesTeam3HaveRunners will be false because undefined is falsy
In this example, we used Boolean() to convert a value to a boolean. If the value is truthy, the function will return true, and if the value is falsy, the function will return false.
Another example might be if we want to check if a team name has been given. This can be done by simply passing a string into Boolean().
team1.name = 'Team Warriors';
team2.name = '';

let isTeam1NameValid = Boolean(team1.name); // isTeam1NameValid will be true because 'Team Warriors' is truthy
let isTeam2NameValid = Boolean(team2.name); // isTeam2NameValid will be false because an empty string is falsy
Note that only empty strings are falsy. A string with even a single space ( ) is not an "empty string" since the space is considered a character.
Walkthrough
Negating with the logical not (!) operator
Overview
The logical not (!) used with any value produces the "Boolean opposite" of the value. This means that if a value is true or truthy, using the ! operator before it will make the value false, and if a value is false or falsy, using the ! operator before it will make the value true.
!true // evaluates to false
!false // evaluates to true
!"hello" // evaluates to false, because "hello" is truthy
!null // evaluates to true, because null is falsy
How to Build it
Let's say that the variable isTeamCheckedIn is set to false when a team starts checking in and true when they've completed checking in. A progress bar shows on the screen throughout the check-in process and disappears when the team is checked in. We can set a second variable called shouldShowProgressBar that would hold the opposite value of isTeamCheckedIn. Use the ! operator to set the shouldShowProgressBar variable by doing the following:
let isTeamCheckedIn = false;
let shouldShowProgressBar = !isTeamCheckedIn;
Because the value of isTeamCheckedIn is false, the shouldShowProgressBar statement will evaluate to true , negating the value of isTeamCheckedIn.
Walkthrough
Conclusion
Falsiness and the ! operator are foundational concepts that you will use again and again. Next, you will learn more advanced ways to leverage these concepts in your code and how these concepts can be used to build sleek and powerful applications.
Advanced Logic
Introduction
The best apps take data and turn it into new, more valuable data. For example, a GPS app will take your starting and ending location and produce a new route between those two points. Before GPS could leverage this data, it was a developer's job (i.e., you) to build the code.
One of the most common ways to build new data is by combining multiple truthy and falsy values into one. Surprisingly, combining these values is one of the most commonly used tactics in coding and is something you will do throughout your developer journey.
AND and OR operators are the most common tools in combining truthy and falsy values. You will learn how these operators work and how to use them correctly. We'll also show some more advanced examples to help you see how far truthy and falsy values can take us.
Side-note: it's important to point out that AND and OR work differently in JavaScript due to truthy and falsy values. Make sure you pick up on the nuances, or else, you may find yourself in disbelief when your code produces a string instead of a Boolean value.
Pre-requisites
Before reading on, make sure you have gone over comparisons and falsiness. Advanced logic uses these two topics heavily. We recommend reading this section first to see if that helps solidify your understanding before reviewing past material.
Case Study: Viking Runners
Viking Runners' check-in process ensures teams have all of their documents, team members, and race status accounted for before they start the 24-hour race. The system currently considers single values, but it needs a more sophisticated solution when considering multiple variables. As you learn about more complex conditionals, you will also see how to leverage multiple variables to make the Viking Runners' check-in process more streamlined.
Using the AND (&&) operator with values of any type
Overview
In JavaScript, the AND && operator performs a logical "and" operation that tests for "falsiness" on two operands. An operand is a value on either side of an operator. Using the AND && operator with two boolean operands means that the result of the operator will be true if both of the operands evaluate to true, and false otherwise.
true && true // evaluates to true, because both operands are true
false && false // evaluates to false, because both operands are false
true && false // evaluates to false because not all of the operands are true
You can also use the AND && operator with any non-boolean, truthy operands with slightly different results. Instead of producing a true or false result, the operator will produce the value of either the first falsy operand, or the last operand if they're all truthy.
Let's take a look at the following code to see how the AND && operator works in different scenarios:
0 && "will not be evaluated" // evaluates to 0, because the operand to the left is falsy.
1 && "this is more like it" // evaluates to "this is more like it", because both operands are truthy.
"hi" && null // evaluates to null, because the operand to the left is truth.
In these examples, the AND && operator evaluates each operand to produce a single value. Remember that && greedily evaluates the operands to "make sure" they are all truthy, but "gives up" immediately if a falsy one is encountered. In any case, the resulting value of the expression is the *last operand that is evaluation
How to Build it
The check-in system should perform a final check at the end to ensure all the team has met the requirements. This is the last chance to check for errors, so we want to be thorough. To successfully check-in, a team should have the following:
- a team name
- successfully paid
- the number of runners is greater than 0 and less than 12
To check all of these values, we can do the following:
let teamName = "Weekend Warriors";
let teamHasPaid = true;
let teamRunnerCount = 8;

let isTeamCheckedIn = teamName && teamHasPaid && (teamRunnerCount > 0) && (teamRunnerCount <= 12) // evaluates to true if all conditions are truthy
In the example above, the data results in a successful check-in and isTeamCheckedIn is set to true. This is fine, but let's consider how the result of this operation could have one of three values: true, false, or an empty string. If the team name is an empty string (falsy), then the operation will stop and return the empty string. If the name is not empty (truthy), then the next operand will be evaluated. The process repeats with each operand until either a falsy value is found or the last value is reached. If the logical statement gets to the last value, that is the value that is given to isTeamCheckedIn.
Walkthrough
Using the OR (||) operator with values of any type
Overview
In JavaScript, the OR || operator is a logical operator used to test for "truthiness" in an operand. Unlike the AND operator that will stop at the first falsy operand, OR || returns the first truthy operand it encounters or the last value if all of the values are falsy.
true || false; // evaluates to true
false || true; // evaluates to true
false || false; // evaluates to false
Here's an example of how you might use the OR || operator in JavaScript:
let x = 0;
let y = 5;
let z = 10;

let result = x || y || z; // result will be 5, because x is falsy and y is truthy
In this example, the OR || operator is used to evaluate the truthiness of the operands of x, y, and z. Since x is falsy (i.e., 0), the operator moves on to evaluate the truthiness of y. Since y is truthy (i.e., 5), the operator returns y as the result of the expression.
It's important to note that the OR || operator only evaluates the truthiness of values, not their actual values. In other words, the operator doesn't care whether the value is 5 or "Hello" or true -- it only cares whether the value is truthy or falsy.
How to Build it
Viking Runners allows teams to purchase packages that include t-shirts, water bottles, and other running products during the check-in process. When the system shows the available packages, a team can choose whether to purchase a package. The package's name should be recorded if the team decides to make a purchase. If the team did not select a package, it should be recorded as "None".
Read the following code to see how we might do this using the OR operator:
let extraProductPackage = undefined // the team did not purchase a package
extraProductPackage = extraProductPackage || "None" // results in "None" since extraProductPackage is falsy
The code above looks odd initially, but it uses a common method for setting a default value. Since undefined is a falsy value, the OR ||operator uses the second value and assigns it to extraProductPackage. If extraProductPackage was initially a non-empty string value, it would simply keep its initial value. We don't want is extraProductPackage to remain undefined, and we ensure this by using the OR operator to check it's value and assign a default one if the initial value is falsy.
Walkthrough
Evaluating advanced logical expressions
Overview
To evaluate advanced logical expressions in JavaScript, you can use a combination of the logical AND && and OR || operators.
For example, consider the following expression:
(true && (3 === 1 + 2)) || falseThe first operand is (true && (3 === 1 + 2)), which uses the AND && operator to check if both the first operand (true) and the second operand ((3 === 1 + 2)) are true. Since both operands are true, the AND && operator returns true. This value is then used as the first operand for the || operator, which checks if at least one of its operands (true || false) is true. Since the first operand is true, the OR ||operator ignores the next operand and returns true.
Let's look at another example where we combine AND && and OR || operators and see if you can figure out the result before reading on:
true && true && true && (false || true)The first three operands are all true, so the first three && operators all return true. Since the first three values are true, we could simplify the expression by saying true && (false || true). The now second operand uses the OR || operator to check if at least one of its operands (false || true) is true. Since the second operand is true, the final AND && operator returns true, which is the final result of the expression.
Often, these more complex expressions need to be thought through carefully. Take a look at the following expressions and see if you can determine what the final result would be (tip: you can copy and paste each line into the console to see the result):
(NaN || "no") && "yes"
("" && 7) || 0
undefined && (null || "")
How to Build it
Viking Runners requires teams to have a certain number of runners based on the team's average minutes per mile pace. If the team has an average mile pace of under 7 minutes, they can have as few as six runners. If the team has an average mile pace of 7 minutes or higher, they must have at least 12 runners. By checking these conditions, we can use the OR || operator to determine if a team has the required number of runners.
let teamCount = 6;
let averageMileTimeInMinutes = 6.5;

let isTeamRunnerCountSufficient = (averageMileTimeInMinutes < 7 && teamCount >= 6) || (averageMileTimeInMinutes >= 7 && teamCount >= 12); //the averageMileTimeInMinutes is under 7 and the team has at least 6 runners, so this evaluates to true
This scenario shows that the team has enough team members because the team meets the first set of operands (i.e., averageMileTimeInMinutes under 7 and teamCount of at least 6). If that first set was false, then the OR || operator would check the second set of operands. In the following example, the inputs have changed so the first set of operands returns false:
let teamCount = 8;
let averageMileTimeInMinutes = 10;

let isTeamRunnerCountSufficient = (averageMileTimeInMinutes < 7 && teamCount >= 6) || (averageMileTimeInMinutes >= 7 && teamCount >= 12); //the averageMileTimeInMinutes is over 7, but the team has at fewer than 12 runners runners, so this evaluates to false
In this case, the first set of operands is false, and the OR || operator forces the code to look at the second operand. However, the the team does not meet the second set of requirements (teamCount is less than 12) and isTeamRunnerCountSufficient is set to false.
With that explanation behind us, let's pause and talk about how we might reconsider how this code is written. The best solutions are often the ones that have just what they need and no more. As a developer, we should get into the habit of reevaluating our code to see if we can make it simpler. In our example above, we could remove one of the operands and still get the same results. See if you can decided which operand should be removed.
Walkthrough
Conclusion
Logical expressions are powerful ways of using existing information to make new information. You'll find in coding that the new data powers your applications to new heights. Using the AND && and OR || operator can be tricky at first, but with practice and time, you will get better. You may even see opportunities to add logical expressions to your own code to create new functionality.
With your new understanding of falsiness and advanced logic, you can now learn how to leverage these concepts to make your code "choose" what to do with conditional statements in the next reading. Keep up the great work!
Conditional Code
Introduction
When a program runs, its execution does not follow a preordained path. This same thing happens in life. Perhaps you like walking in the morning, but only if the day is sunny. Otherwise, you prefer to stay home reading. There is a point where a logical choice is made, and this logic determines what happens next.
Similarly, we can create multiple outcomes in programs by telling our code to do something different if a condition is met. These are simply called conditional statements. Conditional statements determine if a code block should be executed based on if a statement is true or false. For example, if a program that uploads images receives an image file, then the file should be uploaded. However, if the file is a text file, the program will show an error message.
In this reading, you will learn how to write a conditional statement, how to test multiple conditions, and how to chain conditional statements. The fact that a program can behave differently depending on conditions is a big part of what makes it feel dynamic and powerful. We will use if statements in most -if not all- programs in our professional life.
Pre-requisites
Familiarize yourself with falsiness and advanced boolean logic. Conditionals will rely on both of these concepts throughout this reading.
Case Study: Viking Runners
Viking Runners has seen significant progress with the system you've built to determine if teams qualify to race. Now they want the system to inform teams when they are not qualified so the teams can fix their issues before the race. Thankfully, you'll be learning about conditionals which will let you update the system to perform actions if certain criteria are not met.
Understanding the if statement structure
Overview
If and condition example
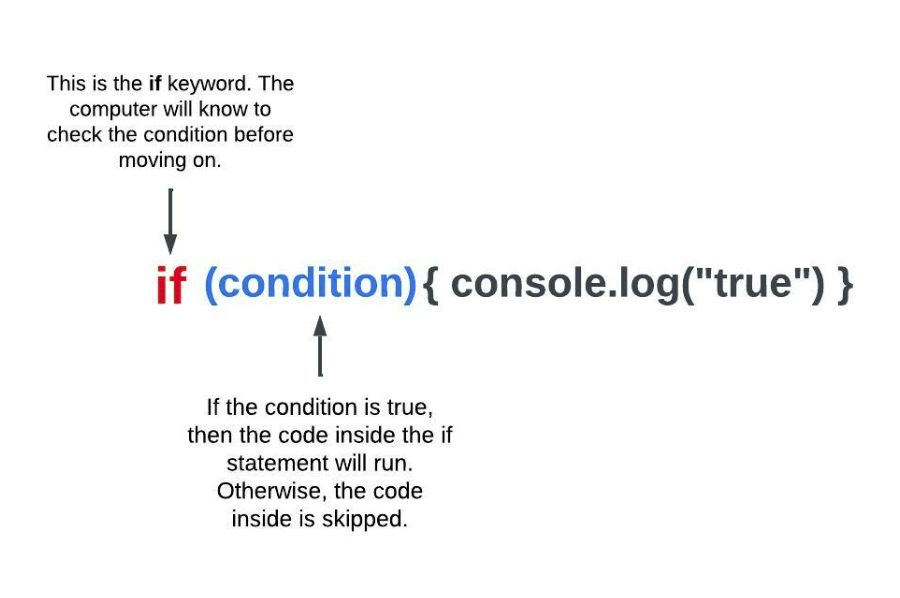
Conditional statements begin with the keyword if.
Following the keyword are parenthesis where the test or condition lives, and the condition can be any expression.
After the parentheses goes a code block. JavaScript evaluates the condition, and only if the resulting value is truthy will the statements inside the code block run.
To see this in action, type the following snippets of code in your browser's console. What do you think will happen?
// the _condition_ or _test_ is inside parens
// and the _code block_ is delimited by curly braces
let lovingJavaScript = true;

if (lovingJavaScript) {
  console.log('Love JS'); // this line runs only if `lovingJavaScript` is truthy
}
We see that the condition is checking if the variable lovingJavaScript is truthy. We can see that the variable is set to true just before the if statement, so the code block is executed.
How to Build it
With the basics of if statements covered, let's look at how we might solve a simple problem with Viking Runners. One of the requirements of check-in is to ensure that each team has the maximum number of runners (12). If they don't have a full team, they can still run the race, but the race coordinator needs to inform the team.
let teamCount = 10;

if (teamCount < 12) { //in this case, this statement is true, so the code block will run
    console.log("Inform the team that they are not a full team.");
}
Let's look at another requirement where all team members must have a name in the system. If a name is missing, the program should inform the race coordinator of the omission. A blank string is falsy, so we can check if the names are blank inside the if statements conditional.
let name = "";

if (!name) { // name is falsy, so the following code block will execute
    console.log("Ask the team captain to update the runner's name");
}
The name is blank (falsy), and with the not-operator, falsy turns to truthy. The race coordinator is prompted to talk to the team captain.
Walkthrough
Using an if statement to set a value
Overview
It's very common in programming to assign a variable's value based on the value of a different variable. In a classic scenario, the programmer sets up an empty "result" variable at the beginning of a program and then, by the end of the program, has the result become this or that, depending on a condition. An example of this concept is common in schools when a word or letter grade is given to a student based on a percentage.
let points = 10;
let result;
console.log(result); // prints undefined

if (points > 7) {
  result = 'satisfactory';
}

console.log(result); // prints 'satisfactory'
Here we see result is assigned a value based on the value of points. However, as you'll see in the next example, you must be careful about where you declare the variable that is getting set in the if statement.
How to Build it
Viking Runners puts teams into different divisions based on age so teams can compete in their respective age groups. The junior division is reserved for a team where all the runners are under 18. By taking just the oldest runner's age, we can determine if the entire team is under 18.
The code to check if a team is in the junior division has already been written, but there's an error: the team division is always undefined regardless of the oldest runner's age.
See if you can find the problem with the following code even when the conditional is true.
let oldestAge = 17;

if (oldestAge < 18) {
  let teamDivision;
  teamDivision = 'junior';
}

console.log(teamDivision); // always prints 'undefined'
The problem is that the teamDivision was declared inside the if statement, causing the value to be cleared when the code block ends. This is a subtle reference to the idea called scoping when a variable's value is only kept within the code block it was defined. We will cover scoping in more detail later, but it's important to be aware of when dealing with if statements. To fix the issue in the previous example, we only need to declare the teamDivision variable before the if statement for the value to persist.
let oldestAge = 17;
let teamDivision; //declared here so we can use it after the if statement

if (oldestAge < 17) {
  teamDivision = 'junior'; // assigning a value to a previously declared variable
}

console.log(result); // prints 'junior'
Walkthrough
Chaining else and else if statements
Overview
Taking action when a condition is met is powerful, but often times the condition is not met. What then? This situation is similar to when we fail to solve a problem on the first try. We will try several alternative approaches one after the other and maybe put in place a fallback plan, in case all else fails. For example: if a player in a game has more than 100 life points, set their health as "excellent". Else, if life points are between 50 and 99, set health as "fair". Else, set it as "poor".
Using the keywords else if together (after the initial if) allows us to account for multiple possibilities in our code. The scenario where no conditions are met can be handled with else.
How to Build it
We will now build out our division code to determine which of the three divisions a team belongs to using the following requirements:
- If all the runners are younger than 18 years old, the team is assigned to the junior division.
- If the team is not in the Junior division but has at least one team member under 40 years old, the team is assigned to the open division.
- If all runners are older than 40 years old, the team is assigned to the masters division.
We will need to take into account the oldest and youngest runner of each team to determine the correct division.
let oldestAge = 17; // oldest is under 18, so this is a junior division team
let youngestAge = 16;
let teamDivision;

if (oldestAge < 18) {
  teamDivision = 'junior';
} else if (youngestAge < 40) {
	teamDivision = 'open';
} else {
	teamDivision = 'master';
}

console.log(teamDivision); // prints 'junior'
Note that as a rule of thumb, the conditions that are more specific -or harder to meet- should come first, and the conditions that are less specific -or are easier to meet- should come later.
It's easy to botch big conditional statements. In the following example, we can see some incorrect logic leading to one line of code never ever being used:
let oldestAge = 17; // this is a junior division team...
let youngestAge = 16;
let teamDivision;

if (youngestAge < 40) { // ...but we check this condition too early
  teamDivision = 'open';
} else if (oldestAge < 18) {
	teamDivision = 'junior'; // 💥 ALERT: this line NEVER runs, since all values less than 18 are also less than 40
} else {
	teamDivision = 'master';
}

console.log(teamDivision); // prints 'open', but it is a junior team
In this example, we erroneously check for the open division first when we should be checking for the junior division. This is because if the oldest runner is 18 or older, we simplify the remaining logic by ruling out one of the possibilities. If we know a team is not in the junior division, then all we need to check is if the youngest runner is under 40 to select the correct division.
Walkthrough
Writing large conditional statements
Overview
We've discussed chaining conditional statements, and now we will look at nesting them. This allows us to set up various results following rules that are as complex as we need. Just watch the correct matching of the curly braces!
How to Build it
Coming back to our first code example where a full team contained 12 people, Viking Runners also has "elite" teams where the max team is 6. Elite teams run an average mile time of under 7 minutes. Let's update our code that checks for team size to include logic for elite teams.
let teamCount = 6;
let averageMileTimeInMinutes = 6.5;

if (averageMileTimeInMinutes < 7) {
	if (teamCount < 6) {
		console.log("Inform the team that they are not a full team.");
	} else {
		console.log("This is a full team. Move onto the next step.");
	}
} else {
	if (teamCount < 12) {
		console.log("Inform the team that they are not a full team.");
	} else {
		console.log("This is a full team. Move onto the next step.");
	}
}
You can start to see how nesting can lead to various outcomes. We can put if statements inside of if statements to handle every possible set of conditions. But just because we can, doesn't mean we should. As a good coding practice, we should always be looking for opportunities to simplify our code, and we can simplify this example. Can you see a way to rearrange this code so you don't have any nested if statements? The solution will be in the practice problems.
Walkthrough
Conclusion
You tackled the most important piece of JavaScript syntax to control the outcome of a program: the conditional statement. You have learned about an if statement's structure and how it can be used to solve simple and complex problems. Viking Runners now has a streamlined check-in process thanks to if statements and every programming task you are given will likely use them as well. Armed with this knowledge, you can start writing programs that do real work!
Conditional Statements
Conditional statements let your code make decisions and execute different code blocks based on different conditions.
Understanding the If Statement Structure
Conditional statements begin with the keyword if. Following the keyword are parentheses where the test or condition lives, and the condition can be any expression. After the parentheses goes a code block. JavaScript evaluates the condition, and only if the resulting value is truthy will the statements inside the code block run.
// the _condition_ or _test_ is inside parens
// and the _code block_ is delimited by curly braces
let lovingJavaScript = true;

if (lovingJavaScript) {
  console.log('Love JS'); // this line runs only if `lovingJavaScript` is truthy
}
Real-World Example
Let's look at how we might use an if statement in a real application for a team running event:
let teamCount = 10;

if (teamCount < 12) { //in this case, this statement is true, so the code block will run
    console.log("Inform the team that they are not a full team.");
}
Another example checking if a team member's name is entered:
let name = "";

if (!name) { // name is falsy, so the following code block will execute
    console.log("Ask the team captain to update the runner's name");
}
Remember: JavaScript evaluates these conditions to either truthy or falsy values. Empty strings, 0, null, undefined, and NaN are all falsy values. Almost everything else is truthy.
Logical Operators
Logical operators allow you to combine multiple conditions in sophisticated ways.
Types of Logical Operators
The AND operator (&&) returns true only if both conditions are true:
let isRegistered = true;
let hasPaid = true;

if (isRegistered && hasPaid) {
    console.log("Welcome to the event!");
} else {
    console.log("Please complete registration and payment.");
}
In this example, the message "Welcome to the event!" will only display if both isRegistered and hasPaid are true.
The OR operator (||) returns true if at least one condition is true:
let isAdmin = false;
let isPremiumUser = true;

if (isAdmin || isPremiumUser) {
    console.log("You have access to premium features.");
} else {
    console.log("Access denied. Upgrade to premium for more features.");
}
Here, the message "You have access to premium features." will display if either isAdmin or isPremiumUser is true.
The NOT operator (!) reverses the boolean value:
let isEmailVerified = false;

if (!isEmailVerified) {
    console.log("Please verify your email address.");
}
This code checks if email is NOT verified, and if so, displays a prompt to verify.
Combining Logical Operators
let age = 25;
let hasTicket = true;
let isVIP = false;

// Complex condition using multiple logical operators
if ((age >= 18 && hasTicket) || isVIP) {
    console.log("Welcome to the event!");
} else {
    console.log("Sorry, you cannot enter.");
}
This example allows entry if the person is 18 or older AND has a ticket, OR if they are a VIP (regardless of age or ticket status).
Loops
Loops allow you to execute a block of code repeatedly until a specific condition is met.
Types of Loops
The for loop is used when you know in advance how many times you want to execute a block of code:
// Print numbers 1 to 5
for (let i = 1; i <= 5; i++) {
    console.log("Number " + i);
}
A for loop has three parts:
- Initialization:
let i = 1- Sets a variable before the loop starts - Condition:
i <= 5- Defines the condition for running the loop - Increment:
i++- Increases a value each time the code block is executed
The while loop executes as long as a specified condition is true:
let count = 1;

while (count <= 5) {
    console.log("Count is: " + count);
    count++;
}
Warning: If you forget to increment the variable used in the condition, the loop will run forever, causing what's known as an "infinite loop."
The do-while loop is a variant of the while loop that executes the code block at least once before checking the condition:
let i = 1;

do {
    console.log("The number is " + i);
    i++;
} while (i <= 5);
This is useful when you want to ensure the code runs at least once, regardless of the condition.
Tip: Choose the appropriate loop based on your needs:
- Use
forwhen you know the number of iterations. - Use
whilewhen you don't know how many times the loop will run. - Use
do-whilewhen you need the code to execute at least once.
Switch Statements
Switch statements offer an alternative to if-else chains when you need to compare a value against multiple options.
Basic Switch Statement
A switch statement evaluates an expression, matching the expression's value against a series of case clauses:
let day = 3;
let dayName;

switch (day) {
    case 1:
        dayName = "Monday";
        break;
    case 2:
        dayName = "Tuesday";
        break;
    case 3:
        dayName = "Wednesday";
        break;
    case 4:
        dayName = "Thursday";
        break;
    case 5:
        dayName = "Friday";
        break;
    case 6:
        dayName = "Saturday";
        break;
    case 7:
        dayName = "Sunday";
        break;
    default:
        dayName = "Invalid day";
}

console.log("Today is " + dayName); // Today is Wednesday
Important: Don't forget the break statement after each case! Without it, the code will continue executing the next cases even if the condition is not met.
When to Use Switch vs. If-Else
- You are comparing a single variable against multiple possible values
- You have many possible conditions to check
- The values being compared are fixed values (not ranges)
- Code readability is a priority for the specific scenario
- You need to test different expressions (not just one variable)
- You need to check for ranges of values
- You have complex conditions using logical operators
- You have only a few simple conditions to check
Guided Project: Program Flow
This Guided Project is designed to help you understand the concept of truthiness and falsiness in programming and how it's used in code. Whether you're a beginner or have some experience, we've got you covered! We'll take you through each topic step by step, starting with how to set up your computer, so you can follow along with the presentation. You'll learn about flawed logic, the modulo operator, and using parentheses in complex expressions, and by the end of the project, you'll be able to apply everything you've learned to your own code. So get ready to take your coding skills to the next level with this Guided Project on truthiness and falsiness!
Module 2 Project: Program Flow
Locked
Overview
This module project will test your ability to make logical statements, a critical skill in software engineering as it allows for clear, efficient and accurate coding, ultimately leading to fewer bugs and improved program functionality.
The module project contains advanced problems that will challenge and stretch your understanding of the module's content. The project has built-in tests for you to check your work, and the solution video is available in case you need help or want to see how we solved each challenge, but remember, there is always more than one way to solve a problem. Before reviewing the solution video, be sure to attempt the project and try solving the challenges yourself.
If you can successfully get through all the Module Projects in a sprint, you are ready for the Sprint Challenge and Sprint Assessment, which you must pass to move on to the next Sprint.
Project Instructions
The link below will provide you with a direct download of a Module Project zip file:
Program Flow Module Project.zip
- download the file,
- unzip the project, and
- open the index.html file in both VSCode and the Chrome Browser.
- VSCode is where you will make code changes, and
- Chrome is where you will check if your code is passing all the tests.
- In Chrome, open the Console by typing Ctrl+Shift+j (Windows) or Command+Option+j (Mac).
- Return to VSCode and start working on your Challenges.
- When you want to check if your code is correct, save changes, go to Chrome, and refresh the page.
- Test results and possible crashes will show in the Console.
- If the code contains a graphical component, it will display in the browser window.
Walkthrough
Additional Resources
Try It Yourself
Practice using control flow by completing these exercises:
- Write a program that determines if a user is eligible for a discount based on their age and membership status.
- Create a loop that counts from 10 to 1 and then outputs "Blast off!"
- Use a switch statement to display different messages based on a user's role (admin, editor, viewer, etc.).
- Create a program that checks if a number is even or odd using conditionals.
Remember to test your code with different inputs to make sure your control flow works correctly!